Thursday, March 31, 2011

Mora Companion/Clipper Extended Tang

We’ve all grown familiar with the Mora Clipper over the years. Some people love it, others like me, don’t, but the incredible shortness of its tang was always a point of contention with this knife. Often it’s been given as an example of how even the smallest of tangs can make a useful knife. You can see more details about the Clipper here.

Well, it looks like Mora will be replacing the Clipper with the Companion MG knife. In all respects it appears to be the same as the Clipper, with minor changes to the finishing of the handle.


The significant change however is that it will have an extended tang. The drawing above was released by Mora, showing a tang that is significantly longer than that of the Clipper. The Mora Companion is already being sold. One location where it can be found is here. If you want a Clipper for your collection, now may be the time to get one.

Wednesday, March 30, 2011

Trail Blazer Take Down Buck Saw Sheath Review

Recently I ran across a product that I was not expecting to find. It is a sheath made specifically for the Trail Blazer Take Down Buck Saw. They have it for both the 24 inch and the 18 inch saws. I found it on this site.


The sheath is a basic nylon design, although the material is quite thick and robust. It has a velcro closure. The saw fits in it very well. And is held securely. It works particularly well if you have modified the saw as I did here. The sheath keeps it from coming apart in your pack (has never actually happened to me).


The sheath adds some weight and bulk to an already large saw, so I’m not sure it is worth it. The saw itself contains all the parts very securely, so the sheath might be overkill for $15.00, but if you’ve been looking for one, this one works very well.

Tuesday, March 29, 2011

Inuit Man in a Kayak, c. 1929

This is an image of an Inupiat from Noatak, Alaska. He is using what was known as qajaq, constructed from a rigid frame covered with seal skins. It appears that the Inuit name for this boat is the origin on the word “kayak”.


This image can be found in the US Library of Congress.

Monday, March 28, 2011

Council Tool Velvicut 4 lb Dayton Axe Prototype First Look

As you know, Council Tool will be releasing a new line of axes called Velvicut. They intend for some of the models within that line to be aimed directly at the bushcraft community, and it appears that down the line there is Hudson Bay axe and a double bit cruiser axe in the works. The first one to be released in the line however is the 4lb Dayton axe, designed to commemorate the 125th anniversary of the company. I was given the opportunity to test and give feedback on a prototype of this axe, and I want to give you guys a look here as well. Of course there will be changes in the final product, and I’ll try to specify what I’m told those changes will be.


Specifications:
Manufacturer: Council Tool Co. Inc.
Axe Head Weight: 4 lb
Axe Length: 35 inches
Axe Head Material: 5160 Differentially tempered steel
Handle Material: Hickory
Cost: $170.00


The Velvicut axes will not be cheap. This one certainly isn’t. It is intended to be a top of the line production axe, and to go head to head with Gransfors Bruks. In that respect, the price is reasonable (a comparable Gransfors Bruks American Felling Axe sells for about $200.00). To compete at that price level however, the axe has to meet some very high standards.

Here I will compare the Council Tool Velvicut 4lb Dayton Axe to the Gransfors Bruks American Felling Axe. You can see the two of them here.


The handle of the Velvicut axe is hickory, and has the familiar Council Tool design. I found it to be very comfortable, as I generally tend to like their handle designs. The grain alignment on this one was not good, certainly not top of the line good. I was assured by Council Tool that they had a problem with this particular batch of handles, and that the handles used on the final product would be of much higher grade.

The head of the Velvicut axe is attached to the handle using a method identical to that used by Gransfors Bruks, utilizing a wooden wedge and a metal pin. The attachment was very secure.


The design of the head is beautiful. It reminds me of a vintage Kelly Flint Edge head. All the lines are clean, proportional and well aligned. The overall shape is exactly what I like to see in an axe (I am partial to the Dayton pattern). The cheeks are thin and transition smoothly into the eye. They also have a feature which is common on vintage axes, but is rare to see today-the cheeks are tapered towards the top and bottom of the head. This is a design feature used to minimize binding of the head. The smooth and continuous lines of the head, combined with the tapering of the cheeks, makes this axe great for both chopping and splitting. The head is made of high grade 5160 steel, and as with the other Council Tool axes it is differentially tempered. It will also be tempered harder than the regular line, coming in at about 52-56 HRC.

I found the edge of the axe to be thicker than I like. It wasn’t too thick, but was not as thin as that of the Gransfors Bruks American Felling Axe. Council Tool assures me that on the final product the edge will be significantly thinned out. As it came, it was sharp and very durable, but on a high performance axe, I like to see a thinner edge.

The balance of the Council Tool Velvicut 4lb Dayton axe is good. It is not perfect, as you see the bit hanging somewhat low when the axe is balanced. The balance seems comparable to that of the Gransfors Bruks American Felling Axe.


The axe comes with a leather sheath. I am told they are still finishing up the design, so there isn’t much I can say about what the final product will be.

Overall, I have high hopes for the final product. Obviously this was never intended to be an axe that you carry in you pack, but if the design and quality characteristics of the final product are up to par, I would be very excited to see some of the other models that will be released in the line. What you see above is just the prototype, so we still have to wait and see what the final product looks like. This particular axe should be released sometime in April.

Friday, March 25, 2011

Far Out-Heimo's Arctic Refuge

This video provides a short glimpse into the life of one of the last frontiersmen. Heimo Korth, a Wisconsin native, moved to Alaska in 1975 at the age of twenty. Eventually he build his own cabin, and married a native woman, Edna. His cabin is currently located in the Arctic National Wildlife Refuge. Current construction is prohibited, but Heimo is allowed to live there because his property was build before the refuge was established.


There is also a book about Heimo’s journey, titled The Final Frontiersman.

Thursday, March 24, 2011

Myths and Misconceptions About Drop-Forged Axes

I should start by saying that I am in no way an expert on forging techniques, and everything I am about to say is based on my own research. As always, take everything I say with a grain of salt.


If we look at the market today, we will see two different types of axe manufacturers. There are those who produce drop-forged axes (Council Tool, etc), and those who claim that their axes are hand made (Gransfors Bruks, etc). Because of that dichotomy, and the understandable market pressures, and perhaps sentimentality, numerous misguided statements and outright lies currently circulate in the forums and common opinion with respect to the quality of each type of axe.

The Forging Process

When we look at a forged product, there are generally four stages that can be observed.

The first is the production of the steel. Many of the famous axe manufacturers made their name because they were innovators in the field of steel production.

The second stage, and the one that distinguishes a forged steel product from a cast one, is that the steel is then taken and repeatedly folded and hammered. This process creates a lamination of the different steel layers, increasing the strength of the metal. This is a long a laborious process. As soon as automated hammers were invented, they were put to work at this stage. An automated hammer can do the work much faster and apply more force, which allows for the force to penetrate deeper into the steel, making for better bonds and stronger metal.

The third stage, and the one to which we most often refer when we speak about the distinction between hand forging and drop forging, is the process of taking the now prepared ingot of steel and forming it into a specific shape. This can be done either by hand, or with the help of an automated hammer.

The last stage is the tempering and annealing process where the steel is hardened.

Different Types of Forging

One method of forging, which we have all seen at some point on television, is hand forging. This involves a person using a human powered hammer and an anvil to shape the metal. In the early stages of metalworking, a person with a hammer in his hand was also responsible for the second stage in the forging process, i.e. repeatedly folding the metal. As soon as the automated hammer was invented, the blacksmith saved his energy for the shaping process only. You can see an example of actual hand forging here.

The second method is to use a trip hammer. This was probably the earliest form of automated hammer. It utilized a cam, usually powered by a water wheel, which applied pressure on the haft/handle of the hammer, which lifted around a pivot, and then lets it fall. These hammers remained in use well into the twentieth century.

The third method is drop forging. The drop hammer differs from the automated trip hammer in that the weight is raised vertically, usually using hydraulics, before letting it fall. There are two distinguishable forms of hot drop forging.

The first is open die drop forging. In this process, both the hammer and the anvil have a specific shape, but the metal is allowed to expand freely to the sides when struck. In this process, the ingot is usually taken through successive hammers with different dies until the final product emerges. As far as I am aware, this is the method used by all the axe manufacturers who claim to “hand forge” their axes. The reality is that this is just another type of drop forging. You can see the process here.

The second type of drop forging is the closed die or impression method. Similarly, here there is a die on the hammer and the anvil, except that the die on the anvil has side enclosures. That way the metal is more quickly formed into the desired shape. This method also requires a number of hits from successive hammers with different dies. The number of hits required is usually less than in the open die method. This is the forging method used by most large scale axe manufacturers, and just about every other part of the metal forging industry.

An Issue of Quality

So, when it comes to quality, what is the advantage of an axe made using the open die forging method as opposed to the closed die method, or even a truly hand forged one? We constantly hear about how hand forged (in reality open die drop forged) axes are much better than drop forged ones. There is no shortage of questions such as “Why would you spend that type of money on a drop forged axe?” So, what is the advantage?

I have been trying to find out for some time now, and there doesn’t seem to be any. In fact, there is a clear advantage of the mechanized method as opposed to true hand forging. By automating the second step of the forging process, the quality of the metal is improved because of the higher weight of the mechanized hammer, which causes better distortion within the layers of the metal, making it stronger.

But what about open die vs. closed die forging? I can’t find anything that would indicate a difference in the quality of each product. There have been some statements about how the smith is more involved in the open die method, and that is certainly true in most cases. That however does not make a better product. The skill of the closed die drop hammer operator is just as critical. We have all seen axes produced with both methods that have been of very low quality, and ones that have been of very high quality.

So why do people think that “hand forging” is better? Why do certain older methods of production remain? The only answer I can offer is that proposed by Henry J. Kauffman in his book American Axes: “It is often difficult to understand why old methods linger while new ones are available, but this practice in axe-making has a logical explanation. The cost of a drop forge has to be reckoned against the cost of a number of triphammers. Since the axe business in recent years has been comparatively small, with reasonably small capital involved, the high cost of a drop forge was delayed as long as possible. Besides, there has been a strong conservative tradition of holding on to old techniques-if old, ergo they are good-particularly, as long as they stay competitive with the new.”

Here Kauffman is talking about the transition between trip hammers and drop hammers, but the same reasoning and financial pressures exist when we are talking about the different drop forging methods. A company like Granfors Bruks, which produces a small number of axes is unlikely to find it financially feasible to purchase a high end modern drop forge. In that way, the older methods and technology survive, and are then marketed as desirable instead of as financially necessary.

The reality is that most of the old axes for which we fight on ebay were made using a drop forge. Certainly that in no way diminishes the quality of the product, nor is the quality of a well made Gransfors Bruks axe lowered because a different type of drop forge is used. When judging axes, look at the product, and see if it works. As always, don’t buy the hype.

Wednesday, March 23, 2011

Garant Snow Shovel Review/The Importance of a Snow Shovel

Well, I thought winter was at an end, and officially, we are now few days into spring, but we just got a fresh round of snow, which prompted this post.

In many areas, snow is a reality of winter camping. It is something that has to be accounted for and managed during an outing. Setting up camp directly over several feet of snow is not advisable, and is right down impossible if you will be heating the area with a fire. Life can be made much, much easier by a good snow shovel. Of course, a standard snow shovel would not be a realistic thing to carry on your back for any significant distance. With some looking around however, alternatives can be found.


The shovel you see here is the Garant Kid’s Shovel. I am yet to be able to find a Garant axe in the US, but their shovels seem to be everywhere. I bought this one for $13.00 at a local hardware store. The shovel is 33.75 inches long and weighs 1.9lb.


The shovel is well constructed. The plastic is of good quality, the handle has cutouts, which reduces weight, and most importantly, the shovel is a size which can be realistically carried while backpacking. Even though this is a relatively small show shovel, and I would not want to shovel out a driveway with it, it makes camping in the snow significantly more pleasant. The additional weight is something to consider. There are probably lighter snow shovels out there, but I am yet to find a method of clearing out a camp site in the snow that even comes close to comparing with using a small shovel such as this one.

Tuesday, March 22, 2011

Wood Trekker is Open for Comments

When I first started this blog, I just wanted to create a place where I can post my ramblings about camping, backpacking and everything related. It was a way to write and publish my thoughts without having to get into conflicts with people on different forums. I never expected to have so many people read the blog, or care about what I have to say. After all, I have absolutely no claim to expertise when it comes to any of the subject about which I write.

Lately, more and more readers have been requesting that I allow comments on the blog. I have resisted it so far because I didn’t want this to turn into a place where people fight over issues. That being said, I’ve decided to start allowing comments to my posts. I can’t promise that I’ll be able to keep track of all of them, so if you need to reach me for a question or anything that is important to you, please, as always, send me an email.

Monday, March 21, 2011

A Brief Look at the Gransfors Bruks American Felling Axe

This is another axe from the very well known axe manufacturer Gransfors Bruks. This is a full size felling axe, and I believe is the largest that they offer. These axes are not particularly common, and for that reason I though I would put up some comparison pictures so that people can get a better idea of the tool.


Specifications:
Manufacturer: Gransfors Bruks AB
Axe Head Weight: 3 1/4 lb
Axe Length: 35 inches (also comes with a 31 inch handle)
Axe Head Material: Unknown Swedish steel, HRC 57 on the Rocklwell Scale
Handle Material: American hickory
Cost: $200.00

The Gransfors Bruks American Felling Axe is a beautiful tool. The quality is what we have come to expect from Gransfors Bruks. There were no defects of any type and the final product was ready to use as soon as it arrived. I found the usual Gransfors Bruks design to be a lot more appealing on this larger axe than on the smaller models. The Rockaway head pattern is much more appealing to me in its full form, as seen in the American Felling Axe.

Like I mentioned before, this is a full size axe. With a 3lb head, it is probably the smallest full size felling axe that I have seen, but none the less, it is a substantial tool. Here you can see the Gransfors Bruks American Felling Axe next to the Grasfors Bruks Scandinavian Forest Axe.


The head of the Gransfors Bruks American Felling Axe is very well designed. In this model we can actually see the full pattern on which the smaller Gransfors Bruks axes are based. The smaller models simply take this Rockaway pattern and cut off several inches from the top and then shrink it. I find the head of the American Felling Axe much more appealing than any of the other models Gransfors Bruks produces. It offers a good balance between length of the bit and width of the face. Also, it is hard to see from the picture, but with this model the typical abrupt transition of the cheeks near the eye is gone, making the sides of the head smoothe and continuous.


The convex of the bit is very thin for this size axe, allowing for great chopping ability. As with all Gransfors Bruks axes, you have to be careful to protect the edge, and the thin convex combined with the hardness of the metal leaves it prone to damage. The head is attached to the handle with a wooden wedge and a metal pin just like on the other Gransfors Bruks models with which we are familiar.


The balance of the axe is fairly good, but not as good as on the Scandinavian Forest Axe. The bit hangs a little low. In my opinion the poll could have used a little more weight. Overall however, this is very good balance particularly on a full size axe.


The handle is of very high quality as is to be expected. This model also comes with a 31 inch handle, and with a straight handle. My favorite is the 35 inch curved handle that you see above, but it is good that they offer variations to accommodate people’s preferences.

The axe is a joy to use, and there is nothing negative that I can say about its performance. It is certainly more axe that I would want to carry on my back in the bush, but if I needed a full size axe, this would rank among my top choices. There is nothing special or fancy about it, but the simplicity of a well made, sharp tool is hard to resist.

Friday, March 18, 2011

Mora “Bushcraft Survival” Knife Coming Soon

It appears that Mora will be releasing a new knife. The knife itself looks exactly like a Bushcraft Force. The new features appear to be in the sheath. It comes with an integrated sharpener and a fire steel. It is not clear how soon it will be released, or how much it will cost. It is a good bet that it will be released in Europe before it is in the US. Here is the excerpt from Mora:


"Bushcraft Survival – A razor sharp blade with a distinct tip, an all-weather Morakniv® Fire Steel and a Diamond Sharpener make the Bushcraft Survival the natural choice for those who love the great outdoors.

The 2.5mm thick Swedish stainless steel blade stays sharp for a long time, is extremely tolerant against wear and has considerable cutting strength. The blade is ridgeground especially for use with the fire steel.

The robust sheath is provided with a well thought out space for the firesteel and completed with a diamond sharpener, making it easy to sharpen the knife blade. A black handle with high-friction grip gives the finishing touch to the Bushcraft Survival, a knife that suits a tough lifestyle!

-Razor sharp 2.5 mm thick Swedish stainless steel blade with a distinct tip.
-All-weather Morakniv® Fire Steel.
-Integrated Diamond Sharpener.
-Two Belt Clips.


Bushcraft Survival is also available with a black sheath and a black/lime handle."

Thursday, March 17, 2011

Meet Our Foster Dog

As you guys know, my girlfriend and I have two dogs of our own. We have a four year old pug-mix named Maximus and a one year old spaniel-mix named Rhea.

Unfortunately, there are way too many dogs out there without homes, and many end up getting put to sleep in overcrowded shelters. For that reason (and because I think you can never have too many dogs), we’ve started to take foster dogs in our home.

We got our first foster dog this week. His name is Merlin. We are not sure how old he is, but he’s probably around six.


He is in pretty bad shape. He is the same size as Maximus, but at half the weight. He is nothing but skin and bones. On top of that, he is diabetic, which requires twice daily shots of insulin. Because of the diabetes, his vision is also not that great.

Even with all that however, he is the sweetest dog. He loves people, and gets along great with Maximus and Rhea. I know this is not a typical subject on which I post, but I figured I would share. You can better keep up with our dogs at a blog that my girlfriend started: Foster Fluffies.

Wednesday, March 16, 2011

Making a Replacement Handle for an Axe in the Woods

This past week, after once again watching IAWoodsman’s video on the versatility of the trailhawk, I was inspired to see what I can do with a hatchet. The part that I found particularly interesting was not the carving and splitting with the head, as that can be done just as easily with the handle still on, but the impressive speed with which he made a replacement handle.

So often when it comes to axes we obsess so much about the handle being just right, that we start to think of the ability to make a handle for a hawk from a branch as some kind of magic. I got to thinking, how hard would it be to make a hatchet handle in the woods from a branch, using just the head of the hatchet. So here it is:

I used only a hatchet head and a baton to complete the project, in addition to the branch I used as a handle.


I used the hatchet head to shape one end of the branch. This took me about 8 minutes. Since you do not have to reshape the whole handle, but rather only the part that will go into the head, it is fairly easy work. Start by shaping the very top part so that it fits in the head, and then follow that shape as a guide all the way down the carved portion.


Once you know that the head fits, take the head and use it to split the shaped part of the branch. For this I did not use a baton, but just pushed the bit in.


Once that is done, you have to do what I consider the hardest part-making the wedge. This is very easy to do with a knife, but when using a hatchet head, it can be cumbersome. The way I like to do it is take a longer piece and shape one end into a wedge. When that is done, I use the hatchet head and the baton to shorten it. It took me 3 minutes to make this one.


Once you have the wedge, assemble your hatchet. The longer you leave the length of the wedge, the easier it will be to remove it later if you want to take off the head. Each time you remove it, you will probably need to make a new wedge as the process of driving it in usually damages it.


Here is the finished product. It was made in less than 15 minutes. Of course, no one would ever consider using a handle made from a branch, but if we use the same standard we do for tomahawks, the project can be completed almost as easily. You could probably make a tomahawk handle in half that time, but at some point the advantage becomes more theoretical than practical.


Here is what another 10 minutes with a knife gets you. It turned into a very usable hatchet, despite the low quality of the handle.


In fact, the handle was attached so securely, that once I cut off the excess part of the wedge, I had to drill it out afterwards in order to free the head.


Something to keep in mind: If you find yourself in a situation where you have to remove a broken axe handle in the woods, there are two things you can try. The first is to break off the handle below the head, using a rock or any other tool that is available. Then baton it up through the eye. The second way, which works for more stubborn handles is to take a small coal from your fire, and place it in the eye of the head. Then blow on it to hollow out the eye the same way you would if you were making a spoon without a crook knife. This will burn the wood without overheating the bit of the axe. Do not put the axe head directly in the fire because that may damage the temper of the bit.

This post shouldn’t be viewed as a critique of tomahawks, or to prove that hatchets are better. Each tool has its own advantages and uses. I only write this so that we don’t slide off the edge because we saw one very skilled person do something impressive with a tool. There are no magical answers and no perfect tools. There are only skilled people and the tools with which they are familiar.

Tuesday, March 15, 2011

Wood Trekker is Now Mobile Device Compatible

Okay guys, the blog now has support for mobile devices. This should make it much easier to read from a phone or tablet. You will have access to all the same content from your phone, it will just be easier to view, and you’ll notice a different format. I hope this is useful. This will not effect any viewing from a computer.

If for some reason you want to view the PC version from your phone, just scroll to the bottom of the mobile version that appears on your phone, and select “View web version”. I have no idea how I did this, so don’t ask. My girlfriend told me to click on a few things, and this was the result.

Monday, March 14, 2011

Spring is on Its Way

Well, it appears that winter is pretty much over. This past week we’ve had huge amounts of rain, which has managed to wash away all of the snow we had accumulated.


The temperature is also getting to be just about perfect. This weekend it was in the 40s. It is amazing how much more you can do in the woods when your fingers are not freezing.

Saturday, March 12, 2011

Helle Viking Review

The Helle Viking is a knife that was produced as part of a fundraiser for an all around Viking longship voyage. It is supposed to be a recreation of a traditional Viking knife. The original design was created by Arne Emile Christensen of the University Museum of National Antiquities in Oslo.


Specifications:
Knife Length: 8 1/2 inches (217 mm)
Blade Length: 4 3/8 inches (110 mm)
Blade Thickness: Slightly over 1/8 inches, exactly (4 mm)
Blade Width: 7/8 inch (22 mm)
Blade Material: Laminated carbon steel
Blade Hardness: HRC 58-59 on the Rockwell Scale
Type of Tang: Rattail tang
Blade Grind: Scandinavian/single bevel
Handle Material: Masurian birch
Sheath Material: Leather
Cost: $80.00


This is a medium cost knife, mostly because the price has comes down a bit in the last few months. When I originally bought it, it sold for about $100, which would put it in the expensive knives list in my book.

When compared to the Mora 1, the Helle Viking is much more robust and slightly larger. The blade is a little over four inches long. I find it to be a great length. The extra blade length comes in handy when making slicing cuts and I find it preferable to the Mora 1. The blade has a single bevel grind, and the edge is very thin and came extremely sharp. The cutting edge does not extend all the way back to the handle. There is about a quarter of an inch, which is not sharp, and in my opinion is useless. As you already probably know, I like blades that go all the way up to the handle. The spine throws sparks very well.


The knife has a rattail tang. The handle is made of birch, and has a teardrop shape. I find the bottom part to be a little too narrow and as a result uncomfortable. It is not too bad, but some grips don’t work well for me. The rattail tang is also very thin. All rattail tangs continuously narrow towards the end of the knife, but with this one, just like with what I’ve seen from other Helle knives, it starts very narrow as well. This makes it very vulnerable as the point where the knife faces the most stress-the handle and blade junction.


Aside from the above, I had two big problems with the knife. The first was that the handle does not have any bolsters. I understand that it is in part a historical recreation, but without the metal bolster on the front of the handle the wood is very prone to splitting. The quality of the wood is high, so it will hold out to most uses, but eventually you risk splitting it.

The second large problem I had with the knife is that the edge was not evenly ground. It wasn’t a minor error either. The blade almost resembled a chisel grind. This type of lack of quality control is appalling for a $10 knife, let alone a $100 knife. I had to spend a number of hours with a grinding stone to put a presentable edge on it. I have no idea how it got off the production line.

After I had fixed the edge, I took the knife out for some minor testing.

The knife had no problem splitting a three-inch log. The blade is thicker than that of the Mora 1 and you can feel that when using the knife.


Truncating with the knife is also fine. Even though the wood I was using was frozen, there was no damage to the blade, and the handle held out fine.


The Helle Viking also did well with feather sticks. I had spent so much time sharpening this knife because of the imperfections that you could split a hair with it. The thicker blade however, makes it slightely worse at carving tasks than the Mora 1.


The knife comes with a leather sheath. It is not great quality. In my opinion the leather is too thick for this type of sheath, and the design leaves too much of the handle exposed. More than half of it sticks out of the sheath, which worries me.

Overall, this knife is a big fail in my book. The proportions are good, but there are certain design issues that bother me. The lack of a bolster and the narrow tang bother me quite a bit. I would have also preferred a sharpened blade that went all the way back to the handle. I can’t complain too much about the design however because at the end of the day, it is supposed to be a recreation of a traditional Viking knife, so there are certain historical limitations which must be kept in mind. The lack of quality control however is inexcusable. This is not a low cost knife by any means, and allowing a blade that has been so poorly sharpened and misaligned to get off the line is hard to explain.

Thursday, March 10, 2011

How to Make a Fire: A Beginner's Guide

In this post I want to go over some basics of making a fire. I know that most readers here have much more experience, and none of this will be new information, but if you are new to the skill, I hope this proves useful. I will attempt to show a very easy way to build a fire, even under bad conditions. If you can do this, you shouldn’t have much of a problem repeating the process on a regular camping trip. No special skills are required. I will only use a small knife and a folding saw, as these are the wood cutting tools an average backpacker might have.

Here I will be making a fire in the snow. Some of the same challenges are presented when making a fire in very wet conditions. The main problem of course is the unavailability of dry materials. During a hot summer day, it is easy to gather a bunch of grass and twigs from the ground, and toss a match on them, giving you an instant bonfire. When the ground is covered with snow however, such materials are very hard to find. You have probably heard that you should collect dead standing wood, and while true, in most cases a dead standing tree would have lost any smaller branches a long time ago, leaving just a bunch of thick logs, impossible to brake by hand.


The best thing to do when you find yourself in such a situation is to split some wood, using your knife and saw. Even if directly it the rain or snow, wood will be relatively dry in the middle. If you can split it and get to the dry area, you will have the makings of a fire under virtually any conditions.

Look for dead branches that are about three inches in width-think about wrist thick. Use your folding saw to cut several section, about eight inches in length.


Here I have selected three pieces of oak. You should know that different types of wood burn differently. Soft woods, or woods rich in resins or oils like pine and birch burn very fast, and make large flames. Hard woods like oak and hickory on the other hand, burn slowly very much like coal. A fire does not need to have large flames to be effective.


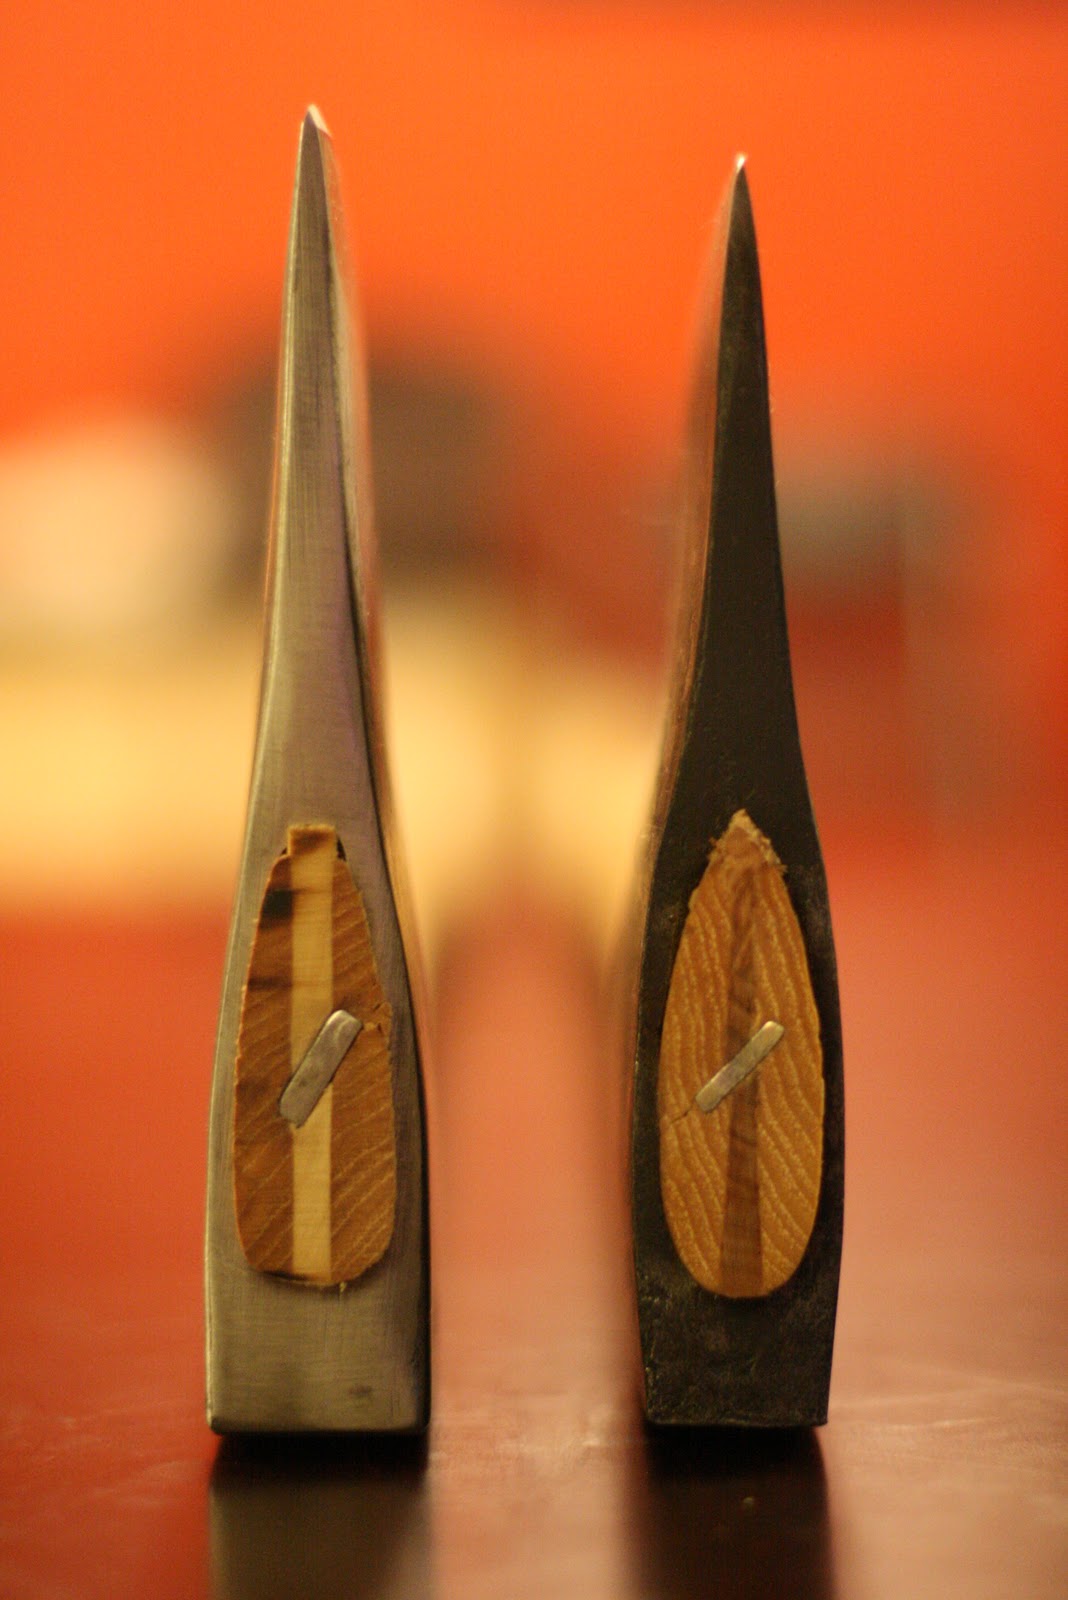
Select a piece of ground that has been cleared from the snow. Take one of the cut logs, and place one and on the ground. Position your knife in the center on the other end.


Take a piece of wood that has some weight to it, and hit the knife squarely on the spine of the blade. When the blade is in the wood, continue to hit the tip of the knife while applying pressure on the handle with your hand. The knife will continue to go down into the wood.


Eventually, the log will split.


Take one of the split pieces, and repeat the process.


Keep doing the same until you end up with pieces of wood that are about the thickness of a pencil. You will need at least a handful of those.

Now take some of the smaller pieces you have split off from the inner core of the wood and make some fine shavings from them. The shavings do not have to be anything fancy.


From the rest of the wood, split some larger pieces of varying thickness. In the picture you see below, I’ve quartered one of the logs we previously cut, and the rest of the pieces have been made from the second log. The third log was used as a baton to split the wood. If I was going to do more than just boil water, I would have split it into quarters as well. With practice, you will figure out how much of a specific wood you need for a particular task.


Now comes a very important part which people often ignore. You need a way to light the fire, and some form of tinder which will take the flame and keep it going until the wood catches. A good tinder should be able to catch the flame from your source (matchet, lighter, etc) and keep it burning for a good period of time. An experienced bushman can find good tinder under virtually any conditions. For the rest of us however, being prepared will save us a lot of misery.


In the above picture you see a small ziplock bag with waterproof and wind proof matches along with a striker. I lighter will work fine as well. You also see an Altoids Smalls tin with tinder. This is a home made tinder comprised of just cotton and Vaseline. It will catch the flame very easily because of the cotton, and will burn like a candle for a long time because of the Vaseline.

There are natural tinders that will also do fine. Dry grass (if you can find it), or even very fine shavings from the inner core of the split wood (about the thickness of grass) will catch the flame. The problem with them is that they burn up very quickly. If that is what you are using, have at least two handfuls. The wetter your wood, the more tinder you will need. Some natural materials such as pine resin and spruce sap will work like candle wax to extend the burn time of your tinder. Birch bark is one of the best natural tinders if available, because it will burn for a long time due to its high oil content. With time you will become more able to find high quality natural tinders, but you should always be prepared with some ready tinder because you never know under what conditions you will find yourself.

So, moving on, take some of the split wood and create a platform on which you will build the fire. For me this is a very important step. Doing this will keep your fire away from the wet ground, and will create a good bed of coals once the fire starts. Place your tinder on the platform, and the fine shavings on top of that. Don’t use all of your shavings because you may need some later.


Then build a pyramid with your pencil thick pieces of wood. The reason to build the pyramid shape is to allow air to freely circulate, and to also create a kiln effect for the flame, raising the heat in the core of the fire. This will significantly improve the fire’s ability to sustain itself.


Finally, finish off the pyramid with some thicker pieces of wood, and light the tinder.


This is always the crucial part of the fire building process. Assuming you are working with less than perfect materials, there is always a danger that your fire will go out at the point where your tinder burns up. Keep an eye on it. You may need to blow some air into the it, or add some more fine shavings.

Once the fire reaches the stage you see in the picture below, it should be on the safe side. You can now start adding more wood to it.


When you see a good bed of coals forming, place some even larger pieces of wood. From this point forward, large pieces of wood are all you will need to keep the fire going. You have now managed to build a small, sustainable fire, which will not require a lot of wood. If you want a larger fire, gradually add more wood and larger wood until you reach the desired size. In better conditions many of the above steps can be replaced by materials that you find on the ground, such as small dry sticks. The steps will however be the same.


So why make a fire? Well, one of the reasons is cooking. Many people are afraid to cook on an open fire, but there is nothing to it. Take your pot, put water in it, and place it directly on the coals. That’s all there is to it. If you need to cook for a longer period of time, and the wood on the fire starts to burn out, lift the pot, place some mode wood (half an inch to an inch in diameter for our example) on the fire and put the pot back on. You don’t need to hang the pot over the fire, or do anything else other than place it on the coals. The pot you see in the picture is titanium. There is no issue with putting titanium or aluminum directly on the fire.


Two cups of a water should come to a boil in a few minutes.


So, here it is; nice and easy. Under better conditions, many of the materials used here can be replaced with easier to find alternatives. You can save yourself some splitting if you have small, dry twigs around you, and if you can find natural tinders, you can save the one you brought. These steps however will produce good results each time.