Friday, December 31, 2010

Council Tool Hudson Bay Camp Axe Review

The next medium size axe I want to review is the Council Tool Hudson Bay Camp Axe (manufacturer’s code 175HB28). It has proven to be an excellent tool from a company that deserves a closer look. For some of the pictures the paint has been removed from the head to provide for a better look.


Specifications:
Manufacturer:
Council Tool Co. Inc.
Axe Head Weights: 1.75 lb
Axe Length: Advertised as 28 inches; measured as 26 inches
Axe Head Material: Carbon steel, HRC 48-55 on the Rockwell scale
Handle Material: Hickory
Cost: $47.00


This is a mid range axe, both in size and price. It is one of the few axes left that is manufactured in the United States from a company that is very responsive to the customer and offers a wide range of products.

In this review I will be comparing the Council Tool Hudson Bay Camp Axe to the Gransfors Bruks Scandinavian Forest Axe. Here you can see the two axes next to each other.


The handle of the Council Tool Hudson Bay Camp Axe is an inch longer than that of the Gransfors Bruks Scandinavian Forest Axe, making it exactly 26 inches long. Even though the axe is officially advertised as being 28 inches long, a closer look at the description on the Council Tool website reveals that during the hanging process, two inches is removed from the handle.

The grain of the handle on the axe I purchased (left) is very poor. It is not the worse I have seen, but if I was planning on using this axe as my main cutting tool, I would certainly put on a new handle. There did not appear to be any polish or finish of any sort on the handle. I had to oil it before use. Other than that, the handle is very comfortable, and quite slim even when compared to that of the Gransfors Bruks Scandinavian Forest Axe, making for a very streamlined axe.


The head of the Council Tool Hudson Bay Camp Axe weighs 1.75 lb, which is about the same as the Gransfors Bruks Scandinavian Forest Axe, which while advertised as having a 2 lb head, actually has a head weighing about 1.75 lb. It is attached to the handle using one metal wedge. At first the connection seemed flimsy to me, but through all the testing, the head remained securely in place. The head is well shaped. The cheeks are fairly thin, and the convex of the cutting edge is just a bit thicker than that of the Gransfors Bruks Scandinavian Forest Axe. The part I don’t like about the head is the abrupt transition of the cheeks when they reach the eye. Instead of providing for a continuous curve, they almost form an angle to the eye, which would impede efficient chopping.


The head is a Hudson Bay style, and has a very large bit, providing form more cutting surface than the Gransfors Bruks Scandinavian Forest Axe.


The balance of the axe is not great, but is also not too bad. Ideally the head would stay horizontal to the ground when balanced like it is in the picture. As you can see, the bit hands lower than the rest of the head, meaning the poll is too light. The balance of an axe is important when we are talking about mid or full size axes because it contributes to the accuracy of the axe.


The axe came with no sheath.

When the axe arrived, it was not as sharp as I needed it to be. About ten minutes with the file and a sharpening stone, put a paper cutting edge on it. As I mentioned, the convex of the cutting edge was a bit thicker than that of the Gransfors Bruks Scandinavian Forest Axe. I got the urge to thin it out. It took me another thirty minutes with the file, and fifteen minutes with the sharpening stone to create the edge I wanted. When I was done, I took it out for testing.

The performance of the Council Tool Hudson Bay Camp Axe was surprisingly good. When it came to chopping, the Council Tool Hudson Bay Camp Axe had no problem keeping up with the Gransfors Bruks Scandinavian Forest Axe, and in fact slightely out performed it (results in the picture are after 25 swings). This is probably a result of the larger bit and slightly longer handle. Keep in mind, that if I had not thinned out the bit, the axe would not have performed as well, although it would have been quite acceptable.


When it comes to splitting, the Gransfors Bruks Scandinavian Forest Axe should in theory outperform the Council Tool Hudson Bay Camp Axe because of the abrupt transition in the head of the Council Tool axe, but honestly, I was not able to see a difference. The truth is that with axes this size, you would need to split some very large logs to be able to see differences in performance. When it comes to bushcraft, logs that size would be very hard to find.

Overall, this is a very good axe, considering the price tag. It is not perfect by any means, but with some work, it can be turned into a very well performing tool. It is also light enough that the head can be used on a shorter, more portable handle. I would love to see it on a 24 inch. Council Tool also makes the same head with a 18 inch handle. I did not use it however because I have found such handles to be too short, especially because they are shortened even further in the hanging process.

There has been some talk from Council Tool that they will be releasing a “bushcraft” version of the Hudson Bay Camp Axe, which will have a non painted head, and be more highly finished. It would certainly be worth a look if the trice tag can be kept low enough.

As far as I know, the manufacturer produces additional bushcraft appropriate axes, which are too numerous to list here, but include Hudson Bay, Jersey, and Dayton patterns.

Thursday, December 30, 2010

An Ax to Grind: the Video

Earlier I talked about the e-book, An Ax to Grind: A Practical Ax Manual, by Bernie Weisgerber. This is the accompanying video to the book. It is also made by the US Department of Agriculture Forest Service, and is a great source of information.

In the past week or so the video has been put up on YouTube, and has hit a number of the forums. Overall the video is about an hour long, and is well worth a look for anyone who is interested in axes.

Part 1


Part 2

Wednesday, December 29, 2010

A Quick Tip on Melting Snow

Most of you already know this, but I though it was worth mentioning considering the recent snow fall on the eastern coast.

Most backpacking pots are made of very thin metal in order to reduce weight. If you just pack one full with snow, and place it on the stove or fire, there is a chance that it will get scorched because the heat will be transmitted so quickly that the snow will sublimate rather than melt. In order to prevent that, put enough water in the pot to cover the bottom, before adding the snow. If you don’t have any water with you, melt some snow in your hands or over the fire.

Tuesday, December 28, 2010

Guest Post: DIY Wood Gasification Stove, by Valcas1

This guest post is by Valcas1. He has done an amazing job creating a functioning wood gasification stove for almost no cost. The moment I saw it, I knew that I wanted to put it up as a guest post, and Valcas1 thankfully agreed. 


For those who are not familiar with this type of stove, a wood gasification stove is different from a fire or a wood burning stove in that this type of stove heats up the wood in such a way that instead of producing smoke, the wood turns into charcoal while emitting flammable fumes. Those fumes are channeled away, and then burned at the top of the stove providing for a clean burn.

I bought a 1qt paint can from my local Ace hardware. $1.99 this one happened to be unlined which is what you want. If you can only get the epoxy lined ones just make sure you burn it real good before cooking.


This is not my idea but I was told that a Progresso soup can will by friction into the inner lip of the paint can. So a can of Chickarina soup was in order for lunch and I now have this.


I cut the bottom of the paint can out with a regular hand held can opener. Some online research says use a safety cutter but I didn't. I think the only benefit from using a safety cutter is you get a bottom that can be put down as to not scorch the ground. Now we have to put holes around the top to allow for the draft between the two cans.I used a Irwin step drill bit as seen is this picture.


You can see how I laid out by vent holes on a piece of paper aand simply taped it to the can as a guide. I went with holes around the top of 3/8" about 1" apart on center.


I am sorry I dont have pictures of this step but you need to put a second series of holes around the base of the inner can. I again used 3/8" and drilled them low on the can. Now take your paint can that you have cut the bottom out and drill 1/2" holes around the base so that you can draw air in and up the side walls between the cans. I started with 4. I figured you can always drill more if needed. I am still trying to fine tune this part.Now press you inner can into the inner lip of your paint can from below. It is a perfect fit and will take some pressure to get the inner soup can to seat well.Looking into the the cans it will look like this.


In the last picture you can see the 1/2" hardware mesh fire grate I made to lift the bottom of my wood off the bottom of the can and over the top of the lower holes. Final picture is of the stove after several burns. I am experimenting with different pot stands now and will update my findings as I progress.


These stoves are designed to burn from the top down so I figured I would show you how I set mine up to light and make some boiled water. First here is my fuel. As you can see it isn't much more than twigs and pencil sized sticks. There were four small pieces of wood that were thumb sized I put in first.


Fully loaded and a few slivers of fatwood for starting.


Starting to burn.


...good burn going now.


No smoke, but lots of heat for that little bit of wood.


Not sure if you can see how it is burning the wood gas in this picture I tried to show it but not sure if I pulled it off.


Cool enough after burning for 15 mintues to do this.


Ended up with this.


Monday, December 27, 2010

Ray Mears Designs and Releases the Wilderness Axe

As may of you know, Ray Mears has recently released an axe that he has designed himself. It is to be called the Wilderness Axe.


It is manufactured by Gransfors Bruks. The manufacturing process is not clear. The website states that it is hand forged, but according to the Gransfors Bruks website, so are all of their axes. I am not sure if what is meant by hand forged here is a guy with a hammer and forge making it in the really old school way, but it is possible seeing how the axe retails for $147 (discounted), with the forging process being given as a reason.

The axe has a 2 lb head and is 23.6 inches long. In weight and size it is almost identical to the Gransfors Bruks Scandinavian Forest axe, with the handle being 1.5 inches shorter. The head appears to have a thicker eye than the Scandinavian Forest axe. Perhaps this feature is designed to facilitate splitting, but in my experience, combined with the thin blade, will not provide any improved performance in that respect. Perhaps there were other reasons behind the wider eye.

It appears to be a good tool, although I see absolutely no need for it. It strikes me as just another attempt by a famous person to make some money by putting their name on a product. If you read the interview that goes along with the axe, you would think that there are no axes out there which would cover the role of this one, when in fact, the Scandinavian Forest axe, and its equivalent by Wetterlings and Hult Bruks are practically identical. It is described as a heavier alternative to the Small Forest axe, without any mention of the more similar Scandinavian Forest axe. This strikes me as a bit disingenuous.

If this was supposed to be a radical improvement in axes, resulting from many years of experimentation, I am sure something more innovative could have been created. The golden age of axe manufacturing produced many high performance designs, many of which would leave this one in the dust. I am not sure why this custom made axe is just a sightly retouched Scandinavian Forest axe. I would be interested to see if it offers any performance advantages what so ever. Personally I doubt it, considering how it is almost indistinguishable from its competitors on the market today.

Please keep in mind that this is just a personal opinion. I have not tested and reviewed the product.

Sunday, December 26, 2010

Condor Bushcraft Basic Knife Review

For this knife review I want to look at a more robust bushcraft knife. Specifically, I will be testing the Medium Bushcraft Knife by Condor Tool & Knife. The way the knife is described by distributors varies from “small” to “medium”. This is the 4 inch blade, and is listed as Model # CTK236-4HC by the manufacturer.


Specifications:
Knife Length:
8 1/2 inches (216 mm)
Blade Length: 4 inches (102 mm); cutting edge 3 1/2 inches (89 mm)
Blade Thickness: 1/8 inches (3 mm)
Blade Width: 1 1/16 inches (27 mm)
Blade Material: 1075 Carbon steel
Blade Hardness: HRC 57-59 on the Rockwell Scale (the information is unconfirmed)
Type of Tang: Full
Blade Grind: Single bevel with a convex edge
Handle Material: Wood inlays
Sheath Material: Leather
Cost: $30.00


In terms of price, I would describe this as a mid range knife. There are cheaper knives out there, but there are certainly ones with much heftier price tags.

The knife is very robust, and features a full tang. At first glance the knife appears to have a single bevel grind, but in fact, the last 1/8 inch of the cutting edge turns into a convex grind. The blade is the same length as the Mora 1, but the cutting surface is actually less because it does not extend all the way to the handle. The blade is a bit thicker and combined with the fact that it is much wider, makes for a very secure feeling and strong blade when compared to the Mora 1. The handle is a bit longer, and is very comfortable.


The design of this knife is very close to what I like to see. The only thing that I would like to see changed is to have the cutting edge extend all the way back to the handle. I never understood the need to have parts of a blade that are not sharp. I understand that this way you can choke up on a blade, but you could do the exact same thing if that part of the blade was covered by handle material. As it is, the unsharpened part of the blade is just an uncomfortable piece of handle. That design issue aside, the construction of the knife is rather lacking. It was hard to show in a picture, but the blade is not evenly ground. Much more material has been removed from one side than the other, making it a partial chisel grind. This shows a rather sloppy production process. While the knife is still usable, this is a defect that should have never made it off the production line.

The knife was fairly sharp out of the box, but needed a few minutes with the sharpening stone. Then I put it through the usual tests.

When it came to splitting, the knife performed very well. I first tried to use a 2 inch log like I did with the other knives, but the knife split it so easily, that I could not get it stuck so I could take a picture. That is why I did it again with a 3 inch log. The knife had no problem going through it.


I felt very comfortable doing a truncating cut with the knife. The added edge thickness and thicker blade made me feel more comfortable letting loose on it with a baton. The added thickness of the edge however made penetration into the wood harder than with the Mora 1.


The knife had no problem with the feather sticks. It is a common misconception that a thicker blade has a harder time making feather sticks. I find that if a blade is sharp, even a thick edge will cut wood just fine. The difference comes when you are trying to make deep cuts into the wood. Then the difference is visible because with the thicker cutting edge, you are pushing more metal through the wood than with the thinner one, requiring more energy and force. I found it just as easy to make feather sticks with the Condor Bushcraft knife as with the Mora 1. The fact that I have been using a convex blade for the past few years probably helped a lot.


Since this is a full tang knife, I batoned the edge into a tree trunk. The knife had no problem doing it.


The sheath of the knife is of rather low quality. It is made out of leather, but the stitching and design leave a lot to be desired. The thread used for the stitching is just white nylon thread, which creates a rather ugly contrast with the black leather. The design looks like it was made for a different knife, and while it holds the blade securely, it is very bulky. It also rides high on the belt, so it would be very hard to carry with a backpack that has a hip belt.

Overall, this knife features a good design, which has been executed very poorly. Had the blade been sharp all the way back to the handle, this would be one of my favorite knife designs. The fact that the blade has been so unevenly ground however makes this a waste of $30. For that price I certainly expect a knife to at the very least not be blatantly defective. Clearly Condor Tool & Knife is not overly concerned with quality control. For that reason I can not recommend this knife.

Saturday, December 25, 2010

Merry Christmas

Merry Christmas everyone from the whole family. Thank you for reading, and I hope you have a very happy holiday.

Friday, December 24, 2010

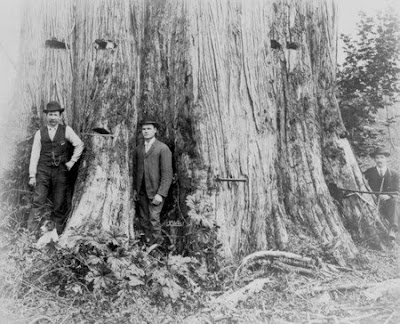
Lumberjacks and a Giant Cedar Tree

Lumberjacks posing next to a giant cedar tree. Photo was taken in 1906.


You can see that the work has been started by making notches in the tree where boards will be placed so the workers can move higher up.

Thursday, December 23, 2010

Razor-Back Camp Axe Review

This is yet another axe manufacturer whose products I wanted to test. I found that the price far exceeds the quality.


Specifications:
Manufacturer:
Union Tools
Axe Head Weight: 1.25 lb
Axe Length: 14 inches
Axe Head Material: Unknown carbon steel
Handle Material: Hickory
Cost: $18.00 (can be found for anywhere between $15 and $30)


The first thing I want to note here is that Union Tools, the manufacturer of this hatchet is actually a huge conglomerate of different manufacturers, which includes, Ames True Temper, Jackson Tools, Razor-Back, Garant, and others. Each division seems to manufacture its own products, so the quality will not always be comparable, even though all the products are made under the Union Tools umbrella.

As with all the other hatchets, I will compare this one to the Gransfors Bruks Wildlife Hatchet. Here you can see the Razor-Back Camp Axe next to the Gransfors Bruks Wildlife Hatchet.


The handle is the same length as the Wildlife Hatchet, around 14 inches. The one I bought had good grain and seemed to be of good quality even though it was covered by a very thick coat of polish.


The head was not properly aligned with the head on the example I have. As you can see, the head stands a bit to the left of the handle. This is an unfortunate reality when it comes to low cost axes.


The head itself is very poorly designed in my opinion. It has a very thick cutting edge, which significantly decreases it’s chopping ability. In fact, it was so thick that I had trouble getting it to stick in the oak for the pictures. The head then continues to be fairly narrow, until it reaches the eye. At that point it expands significantly, creating a huge eye. I don’t see any reason for such a design, and it significantly hinders the chopping ability of the hatchet.


Splitting is not too bad. While some force is required to push the large eye through the wood, the fact that it is so wide, and the edge is so thick, splits most wood quite well. The head is attached to the handle using a wooden wedge and a circular metal pin. The top of the handle seemed to have been damaged and splintered at some point, but the head did not become loose during testing.


The hatchet does not have a sheath, but rather comes with a rubber cover for the edge. It is very likely to end up at the bottom of your pack.

Overall, I can not think of any reason why anyone would spend $30, $15 or even $10 for this hatchet. It gets significantly out performed by the Gransfors Bruks Wildlife Hatchet, which is a quarter of a pound lighter than the Razor-Back Camp Axe. There are many other much better low cost options out there on the market.

As far as I know, the manufacturer produces additional bushcraft appropriate axes: The Boy’s Axe (2.25 lb head, 28 inches in length), The Dayton Single Bit Axe (3.5 lb head, 36 inches in length), The Double Bit Axe (3.5 lb head, 36 inches in length) and the S.B. Michigan Axe (3.5 lb head, 36 inches in length).

Wednesday, December 22, 2010

Trangia Mini 28 Stove Alcohol Stove Review

A while back I did a post on how to light and operate a white gas stove. You can see the post here. In this post I want to demonstrate the basics of using one of the popular alcohol stove designs. In particular, I will be using the Trangia Mini 28 stove. All the Trangia stoves are similar in design, with size and accessory variations.


The Trangia stoves are made out of bras, and feature an open jet design. They have an opening on top, where the alcohol can be accessed, but they also have jets on the side from where pressurized gas can be released. For more information on alcohol stove designs, check out this site.

The Trangia stoves come with a cap, which allows you to keep alcohol in them when not in use. They also have a simmering cover. The type of base of the stove depends on the type of model you get. Some can be quite elaborate. The one I am using here, model 28, or Mini Trangia, comes with just the pot stand. The pure model 28 is no longer made, but you can get it on ebay for about $15.00. What they have now is the model 28-t, which comes with the stand and a 0.8L aluminum pot. It costs about $30.00. The burner itself weighs 3.9 oz, while the burner and pot stand assembly weighs 5.8 oz.

To use the stove, simply remove the cap, place it in the pot stand, and light the alcohol inside. You can put your pot on the stand at this point, but I have kept it off so you can see the flame pattern.


After about 30 seconds to a minute, the stove heats up, and the pressurized alcohol starts to come out of the jets, increasing the heat output.


There is nothing more to it. Just wait for the food to cook. The total burn time for the stove is about 25 minutes. It will boil a litter of water in about 12 minutes. These are very rough estimates, because all the burn and boil times will depend on many factors, such as the type of pot you are using, and the wind conditions.


To simmer with the stove, take the simmering cover, and open it a bit. Place it on top of the lit stove, and the flame will be reduced. Keep in mind that if the stove is very hot, the alcohol will be pressurized, and simmering may not be possible because the alcohol will get pushed out through the opening at a high rate.


To turn off the stove before the fuel has run out, close the simmering cover and place it on top of the stove. It will extinguish the flame.


These stoves are excellent for solo trips. They are very durable, and there isn’t much that can go wrong with them. Operating them is not as easy as it might appear. I’ve burned myself a number of times, trying to put one out by tossing the simmering cover on top of a flame. Also make sure to bring a wind screen. One time I forgot to bring mine, and it was impossible to bring water to a boil. Alcohol is a fairly low energy fuel, and these stoves need to work near the top of their efficiency in order to get the job done. A wind coming across and dissipating the heat, will keep your food cold.