Tuesday, December 21, 2010

Guest Post: Bringing Back an Axe, by dunko

A few weeks back I saw a great post by dunko, showing a step by step restoration of an old axe. I thought he did a great job, and it is information that other people might like to have. I asked if he would be willing to guest post on my blog, and he thankfully agreed. Dunko might be starting his own blog in the near future, so keep an eye out. 

Bringing back an axe!

I've been in the market for a midsized axe for a little while. Since I found a decent head in an antique shop I decided to make a project of it. This is my second axe referb job. I'm no professional but it was fun to do, and I'm happy with how it came out. Seems like the head is put on well but we'll see if it survives a function check. If it does then I'll sand and re-stain the handle.

So with no further adieu...

My axe build:

The head (if anyone has any info on this axe would be great!)


Store purchased 28" handle and supplies:


Steel wooled the rust, and cleaning with naval jelly:


Cleaned up, its not so shabby!


Used a bastard file, stone, and 600 grit sandpaper to sharpen it up a bit. Unfortunately I'm not great at sharpening, but its sharp enough for me.


Sanded to fit the handle, then glued and tapped in the wedge. After the glue dried I sawed and sanded down the excess leaving a 27.5" long axe.


Tapped in a metal wedge.


Added a little stain to the sanded areas, and fin...


Not the prettiest axe ever but it fits the bill for me. I need to make a sheath and a give it a good function test before I'm satisfied, but so far I'm happy.

Thanks for looking!

Dunko

Monday, December 20, 2010

Cheap, Lightweight Backpacking Food, Part 3-Baking

In Part 1 and Part 2 of my look at cheap, lightweight backpacking foods, I mentioned several foods which can be easily prepared in the woods. All of them involved either boiling the food, or adding hot water to the food.

In this part I want to take a look at a type of cooking that is a bit more complex, i.e. baking. In recent years, mostly because of a certain TV personality, it has become popular to make bannock in the woods. Bannock is a form of very simple bread, which was widely used by travelers in the past, and it requires some form of baking. These days, there are many mixes that you can get cheaply on the market, which, through the same cooking process, will produce much better tasting breads. Here I will be using a honey corn bread mix.

Baking can be achieved in the woods in very simple ways. The easiest is to leave the prepared mix next to the fire for it to cook. You can also put small amounts of the mix on a stick and roast it over the fire. Here I want to take a look at a more sophisticated baking process, which would greatly reduce the likelihood of burning the food.

Many of the mixes that you can get will say in the instructions that you can just fry the mix in a pan over the flames. Those instructions however assume a controlled flame and a thick frying pan. When the same procedure is tried in a backpacking pot, which is less than 1/32 of an inch thick, the result will be almost immediate burning of the food.

For this method of baking you will need two nesting pots (I am using a 2L and 1L titanium pots), and a way to separate the two (three small rocks, or as I’m using a metal cap). For this demonstration I’m using an MSR Whisperlite stove.


Take the small pot and add 1 cup of bread mix and 1/4 cup of water. The instructions state that you should add, eggs, butter, etc, but I find that the product tastes fine without any of that. Mix the water and powder until you get a thick mix. If you want your bread to have a specific shape, form it with your hands. If you want the mix to be stiffer, use less water.


Start up the stove and place the larger pot on the stove. Add about 3/4 of an inch of water. You do not need much water, but you may have to add more while cooking if it runs out. This method can be used without water if you have a pot that is thick enough, or you don’t mind damaging. Thin backpacking pots can warp from the heat if there is no water.


Place the small stones or metal divider on the bottom of the pot, and put the small pot in the big one. Cover the large pot and let it cook. You can test to see if it is done by poking the mix with a stick. If it is done, there will be no mix sticking to it.


When done, remove from the flames and enjoy. It took me about 25 minutes to cook the mix in this example. The bread has been slightly eaten in this picture. :)


There shouldn’t be much sticking to the pot, and there will be no burned food using this method. Unfortunately, because the water prevents the temperature from getting too high, it will be hard to get a good crust on the bread. If you were using the method without water the result would more closely resemble baking in an oven, but this way it is safer for the pots.

Sunday, December 19, 2010

Cold Steel Finn Bear Review

In this knife review I will take a quick look at the Cold Steel Finn Bear. Its name implies that it is similar in style to the puukko knives from the region, and should resemble the Swedish Mora knives. In some ways the knives are similar, but in others the Finn Bear is a more typical, non-Scandinavian knife.


Specifications:
Knife Length:
8 1/2 inches (217 mm)
Blade Length: 4 inches (102 mm)
Blade Thickness: 3/32 inches (2.4 mm)
Blade Width: 15/16 inches (24 mm)
Blade Material: 4116 Krupp stainless steel
Blade Hardness: HRC 56-57 on the Rockwell Scale
Type of Tang: Partial concealed
Blade Grind: Hollow ground with a secondary bevel
Handle Material: Plastic
Sheath Material: Cordura
Cost: $10.00


The Finn Bear has a blade with a shape that closely resembles a puukko, and is similar in style to the Mora 1 and Clipper. In length it is similar to the Mora 1, and also has no finger guard. The blade comes almost all the way to the handle. The blade thickness is the same as the Mora 1, but it is wider, more closely resembling the Clipper. The similarities however, do not extend to the grind of the blade. The Mora 1 has a single bevel/Scandinavian grind, while the Finn Bear has a hollow ground blade with a secondary bevel. Because of the hollow ground blade however, the angle of the secondary grind is nearly the same as the single grind of the Mora 1.

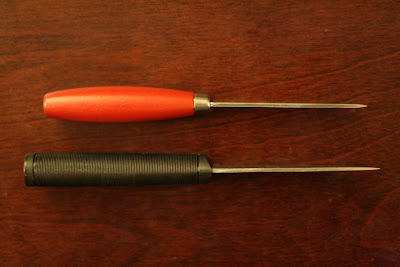

The spine of the blade is rounded off, just like it was on the Mora 1. If you want to use it for striking sparks from a ferrocerium rod, you will have to square it off with a sharpening stone or a file. After that it will throw sparks just fine.

The handle is made out of some type of plastic. It has a very unusual shape. As you can see from the picture, it is tier shaped. This makes it comfortable at certain angles, but not at others. I wouldn’t say it’s bad, but I am not sure why that design was chosen. I much prefer the rounded handle of the Mora 1.


The knife came sharp, but not as sharp as I wanted. I had to spend about ten minutes with a sharpening stone to get it shaving sharp. When that was done, I took it out for testing.

I used the Finn Bear to split a 2-inch log. There was no problem. It performed in a similar way to the Mora 1. I could not detect any difference.


I also used a truncating technique to beat the blade into a log.


After that, it was still capable of making fuzz sticks. There is a common misconception about how a single bevel grind is the best for carving or making feather sticks. It is simply not true. Any sharp blade with a thin edge will get the job done. The grind that will do it the best is the one that you have been using the longest.


As this is not a full tang knife, I did not try to baton the tip of the blade into a piece of wood by hitting the back of the handle. Doing that can cause damage to the connection between the blade and the knife.

The tang goes only about half way into the handle. The tang is a bit shorter than that of the Mora 1, but it is longer than that of the Mora Clipper. (picture not taken by me)


The sheath of the Finn Bear is quite good. It is not complex, there is no quick belt attachment, but it does holds the knife securely. It is much better than the Mora 1 sheath.

From my use, the Cold Steel Finn Bear is a perfectly good knife, and I can not point to any performance deficiencies when compared to the Mora 1, other than the handle. I have seen only one other comparison between the two knives, and there the Finn Bear was used without being sharpened. Once I sharpened mine, the performance was very good. I am not sure whether or not it will get dull faster than the Mora 1, but during the time I used it, it did not lose any sharpness.

In design, it is a bit different than the Mora 1, but it does fulfill the same role. The two knives are the same price, and they offer comparable performance. The Finn Bear is a tough little knife and will be a good complement to an axe. Just like with the Mora 1, any heavy use will push the knife close to its limits, but for normal use, it will be perfectly adequate.

Saturday, December 18, 2010

Spoon Carving

This is an interesting series of videos showing the carving of a spoon from log to final product.

Part 1


Part 2


Part 3