This post is going to be the last one of the series showing the standard modifications I do to my foothold traps before they go into use. You can check out the first two posts here and here. I will have more trap modification posts coming up soon, but they will involve modifications designed to create a portable trapping kit rather than standard modifications.
As I mentioned before, some reasons to modify your traps include:
- To catch and hold the animal more effectively
- To minimize suffering for the animal and any damage to the fur
- To protect and preserve the traps
This post will focus on the last point: protecting the traps. By this I mean protecting your traps from environmental factors, primarily rust. Depending on how you trap, that will hold varying importance for you. How long you leave your traps out at a stretch, whether you use antifreeze to keep the soil loose, and whether the traps are in water will effect how much protection your traps need.
There are generally three ways to protect a trap: dyeing, waxing, and dipping. These methods then generally subdivide into two categories, with dyeing and waxing usually being done together and representing the traditional method, and dipping being a more modern method. Each trapper has his own preferences and will fight to the death to defend them. What I write here are just very general guidelines, and for everything you have heard that you should never do, there are a bunch of trappers doing that exact thing with great success. Keep that in mind as you read the post.
First, I am going to go over the three methods, and the general procedure for using them. This is just a very superficial overview. Then, further down in the post I will show you what I do, which is not necessarily the accepted wisdom.
The Methods:
Dyeing
Dyeing is an older method of treating traps, and many trappers no longer bother with it. The process uses either man made chemicals or natural materials rich in tannins to force a chemical reaction on the surface of the metal, and form a sort of patina on it. This should slow down the rusting process when the trap is exposed to the elements. The reason why this method is not used by many these days is that it doesn’t work too well. A dyed trap will still rust. As a result, this method is usually combined with waxing to provide adequate protection.
Waxing
Waxing is another traditional method for protecting traps, I suppose when wax was available. This process uses molten wax to cover the surface of the trap. It is very effective at protecting the trap as the metal is not exposed to the elements. It is often done as a second step after dyeing the traps, but dyeing is not needed for waxing. General wisdom dictates that certain traps not be waxed. In particular body grip traps and traps for water sets are not waxed because it is considered that it makes the traps too easy to set off.
Dipping
Dipping is a relatively modern method for protecting traps. It uses a dip to cover the surface of the trap much like you would with wax, except without the need for heating. There are different types of dips available. Some use gasoline to dilute the chemicals, others use water. To me they all resemble watered down paint. Just like wax, the dip coats the surface of the metal, protecting it from the elements. Many people make their own dip by diluting Rust-Oleum paint.
The Process:
Generally speaking, with all three methods you have to start by preparing the trap. The first step in the preparation is to clean the traps and remove all of the factory oils from them. The oils will not only interfere with the treatment of the traps, but hold a lot of scents that you may not want on your traps. Some people do that by boiling the traps in water mixed with lye. Keep in mind that lye will erode any aluminum pieces you may have on the trap. I’ve seen people use baking soda as an alternative. I personally just wash the traps with soap.
The next step in the preparation is generally to rust the traps. It’s counterintuitive, but in particular when using dye or dips, you need some rust on the surface of the trap for the chemicals to catch. Leaving the traps outside for a week does the trick.
At this point, the traps are ready for the desired treatment. Dyeing requires that you bring the dye to a boil, and leave the trap in it for the required time depending on what dye you are using. Once taken out it should have a dark color. If you are waxing the trap, heat up the wax (be careful not to ignite it), then submerge the trap, leave it in for a minute or two so that it reaches the same temperature as the wax, and then remove it. Some people like to use heated water with just a thin film of wax floating on the surface through which they pull the trap. Dipping doesn’t require boiling. Just mix the dip as directed, submerge the trap, pull it out, and dry.
What I do:
Here is my procedure for treating my traps:
First, I wash the trap. I use regular dish soap for the job. A lot of trappers worry about this imparting a scent to the trap. In my opinion, it doesn’t, and ultimately it’s not a huge issue. If you are trapping for an animal with a good sense of smell like coyote, they can smell everything you have done to the trap no matter how careful you are. They can smell wax on a trap, they can smell the metal itself, and they can certainly smell that you were digging in the ground. If a dog can track a person over miles just based on where a person stepped with their shoes, a coyote can smell that a human set a foreign object in the ground. My point being, I don’t obsess about it.
The second step is to etch the trap. I don’t like to rust my traps, but trying to dip a brand new trap will cause you all sorts of headaches because the dip will come right off. As an alternative to rusting the trap, I etch it. I do that the same way you would force a patina on a knife: I use a vinegar bath. In a container I put a bunch of vinegar, and top it off with water as needed. I then submerge the traps and leave them overnight. The result is that all the shine is removed from the trap, and the surface becomes much more receptive to a dip. In the picture below you can see an etched trap next to one that has not been.

As you can see, the process doesn’t work nearly as well on the stainless steel pieces on the chain as it does on the rest of the trap, but then, neither does rusting.
The third step is the dip the trap. I use dip instead of wax, or dye and wax because wax annoys me. I know it sounds silly, but I am very neat when it comes to my gear, and a trap covered in wax and all the dirt that gets imbedded in it just bugs me. For that reasons, I prefer dips. They are also much easier to apply because I don’t need to boil any liquid. The early dips used gasoline to dilute the dip, which made many trappers skeptical because there was a noticeable smell of gasoline on the finished trap, and people worried that it would just remain there. By now dips have been used successfully by many trappers, and have alleviated some of those fears, but it’s still something that always remained on the back of my mind. Fortunately these days there are water based dips. The one I use currently is Dakota Line dip. It works relatively well, it’s easy to wash off your hands before it sets, and it’s easy to use.
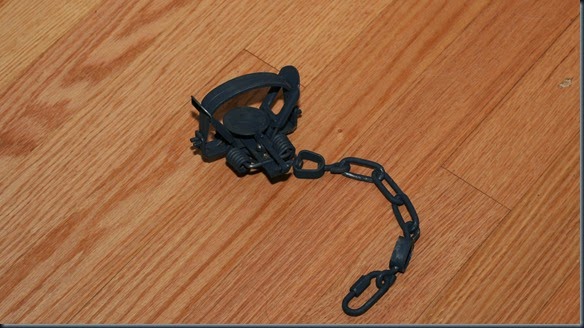
The last step, after letting the trap dry, is to clean up the dip off the important areas. Unavoidably, the dip will pool in certain areas. Most importantly, I like to remove it from the trigger mechanism and the tip of the dog using a small file. I don’t want the added friction on the dip there. I also clean up the areas between the jaws and where the arms meet the jaws.
And these are just some of the general methods available out there, and what I do to protect my traps. That being said, I’ve seen guys do everything from spray painting their traps to just leaving them untreated, and they have all been successful trappers.
So, this wraps up the standard foothold trap modifications that I do. This year I don’t actually plan on running a standard trap line, but I still wanted to replace the trap that went missing, which gave me an opportunity to show you my method. I will have another post shortly, showing the modified lightweight set up that I will try to use this year.


