What?! Well, in my last two posts I had a picture of one of my stoves, and once the posts went up, I started getting questions about it. While I wasn’t planning on posting about the stove for a while, I figured it would be the best way to answer the questions.
I put together this stove system last year. It was specifically designed for a trip I was planning for this winter. Since I will not be able to do the trip due to being busy with the house buying situation, I’ve been testing the stove as much as I can on my other trips.
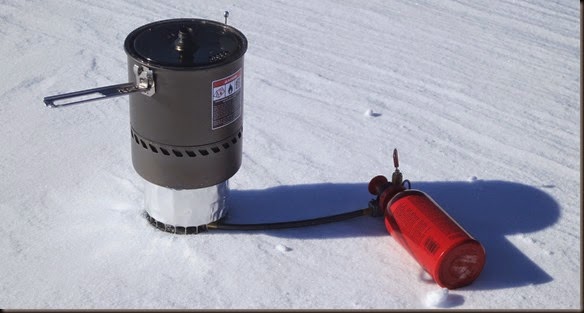
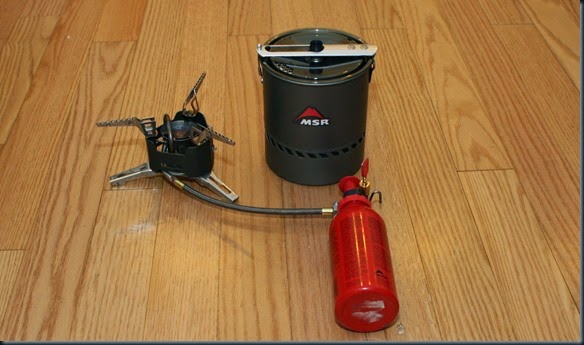
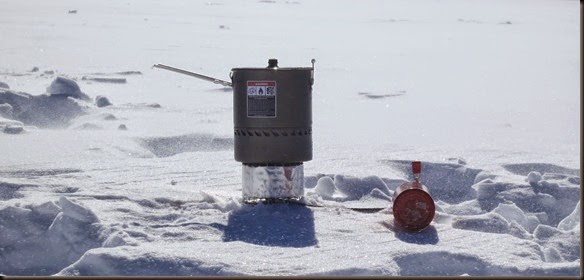
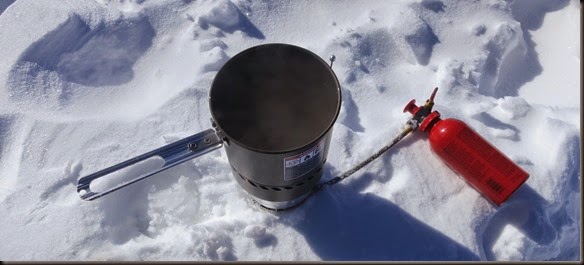
My goal was to make an efficient cold weather stove system designed with the primary purpose of quickly and efficiently melting snow and hating up water. As the title indicates, the result was a MSR XGK EX/Reactor hybrid.
Please note that there is always a risk when messing with things like stoves. When dealing with flammable fluids under pressure, things can get dangerous fast, so if you decide to do stupid things like I do, be very careful.
Over the years I have used a bunch of different stoves, both during cold weather and warmer parts of the year. It has been my experience that with enough care and work, just about any stove can do just about anything you want. I’ve used upright canister stoves in cold weather, I’ve used white gas stoves inside my tent, and everything in between. It wasn’t always a good idea, but I made it work. Just because it worked however, doesn’t mean I liked it. Some stoves are clearly better suited for certain conditions.
Warm weather stove use is fairly easy. Mostly, a stove is asked to just heat up a few cups of water, and to do it in very favorable conditions. As such, stove choice comes down to personal preference more than anything else.
In winter however, a lot more demands are placed on a stove. Not only does it have to function in tougher weather, but more often than not, a stove has the critical role of melting snow for shrinking water. The process consumes large amounts of both fuel and time. As such, a stove that can do the job quickly and efficiently is of very high value.
As you guys already know, I backpack when in the woods, meaning, I carry all of my gear on my back, not on a sled or canoe. As such, I prioritize light and compact gear. It is fairly easy to make an amazing stove system that will be both efficient and fast, but to also make one that is compact and light, is a big challenge.
I played around with different stove types and systems, but none had the exact balance between speed, efficiency, light weight, and compactness that I wanted.
Eventually I decided to make my own. My inspiration for the project was the Willy Gautvik stove system and the Kieron Bradley stove system designed for Christina Franco.
I knew the system would be based on a white gas/petrol stove. They are simply the best design for cold weather use, and on extended trips, the fuel turns out to be the lightest, at least by my calculations. As far as which white gas stove I would use, the answer was easy: the MSR XGK EX. I’ve had the stove for quite some time, but it never got much use. It is an amazing stove, putting out a lot of heat, easy to maintain, and as simple as simple gets. A lot of people point to stoves like the Primus Omnifuel and the Optimus Nova as more sophisticated stoves, but that is exactly why it had to be the XGK EX. Cold weather is hard on gear. The simpler the stove, and the less sophisticated it is, the less likely it is to malfunction. The XGK has been on top of every mountain and to both poles, and continues to be the most chosen stove for arctic travel. So, finally, I was going to find the use for my XGK EX. Of course, it would have to go on a serious diet. Its excessive weight is exactly why I almost never use it.
The stove however is only part of the picture. You need a pot and a way to capture as much of the heat as possible. With a stove like the XGK EX, which puts out a lot of heat, a standard pot simply placed on top the stove would result in a lot of lost heat. There is only so much heat a pot can capture in a given amount of time. After looking around a bit, I decided to use a pot with an integrated heat exchanger. Such post provide about 30% increased efficiency over a standard pot. Unfortunately, they weigh noticeably more than a standard pot. As such, I wouldn’t use one in warm weather, but in cold temperatures, where you are burning a lot of fuel to melt snow, the extra weight can be made up fairly quickly by the fuel savings. Aside from efficiency, the added speed which results from the pot being able to absorb more of the heat produced by the stove, can make life much easier.
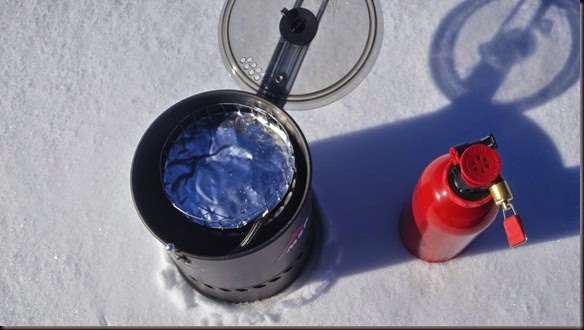
I settled on the pot from my 1.7L MSR Reactor. There is also a 1L pot for the Reactor, but I found it to be too small. I need to be able to melt at least a litter of water at a time, enough to fill a Nalgene bottle. The 1L pot is fine for heating up a few cups of water for cooking, but not for melting snow. I find the 1.7L pot to be a good size. It is also the lightest pot with integrated heat reflector that I was able to find. MSR lists the weight of the post as 10.8oz (306g). On my scale, the pot with lid actually weighed less at 9.3oz (264g).
You may ask, why not just use the MSR Reactor stove. The answer is that I’ve tried, but in my experience it is not a good cold weather stove. While it is recommended by a lot of people as a stove specifically designed to melt snow, it only does that well in relative warm weather. I’ve tried using the stove in the cold, and its performance was seriously lacking. Just like the XGK, the Reactor is a great stove, which doesn’t fit my stove use particularly well.
So, MSR XGK EX/Reactor hybrid… where to start.
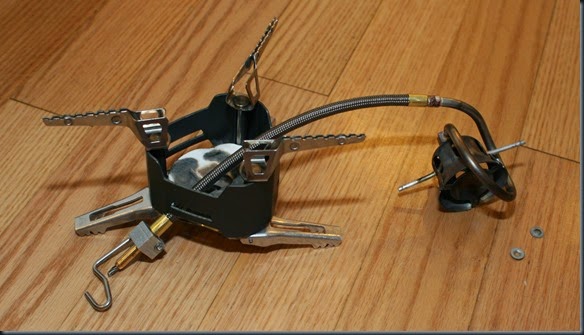
Step one is to put the MSR XGK EX on a diet. It is just too much stove for my needs. It is designed to handle large, heavy pots, something it does well, but that is of no use to me. This added robustness also adds a lot of weight. The stove and pump come in at 13.2oz (374g), with the pump weighing 2.3oz (65g).
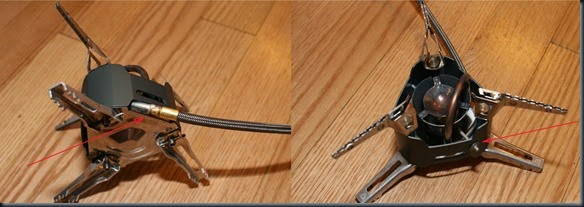
Taking apart the stove is easier said than done. It is not an easy task at all, especially if you are using only hand tools as I was. In order to remove the burner from the rest of the stove components, you have to remove the bottom plate, which keeps the hose in place, which in turn requires removal of the legs; as well as a metal bar which passes through the burner and holds the burner cup in place.
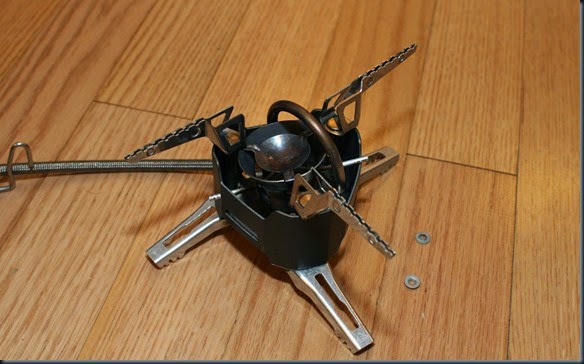
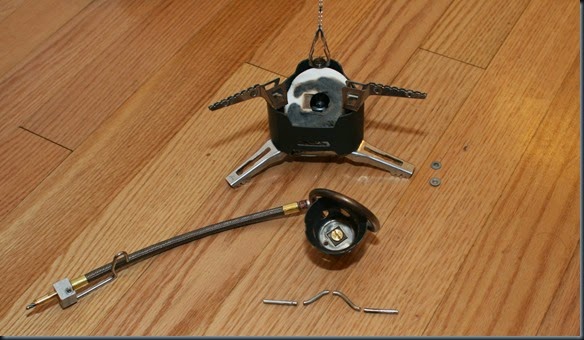
I started by trying to remove the legs, but it wasn’t working out too well. I then decided to pull out the metal bar that holds the burner cup in place. After pulling off the washers holding the bar in place with a screwdriver, some playing around allowed me to pull out the bar from the stove body.
That allowed me to slide out the burner. Of course, the bottom plate was still holding the hose in place. I couldn’t pull out the hose connector through the slot.
I used a pair of pliers to bend the plate and pulled out the hose and burner assembly. I then used a hacksaw to but the metal bar that does through the burner cup. I made three cuts, and it was very time consuming.
The result of all this destruction was to take a stove that weighs 10.9oz (309g) (pump not included), and extract a burner assembly which weighs 4.9oz (139g). The burner cup has a small hole on the bottom, designed to drain the priming fuel onto a pad underneath. I usually prime this stove with alcohol to keep it cleaner, but with the new design, I wanted to be able to fill the base of the burner cup with white gas for priming. I used a #6 screw to fill the hole. That way the priming fuel is held in the burner cup rather than going under the cup.
Next step: building the stove.
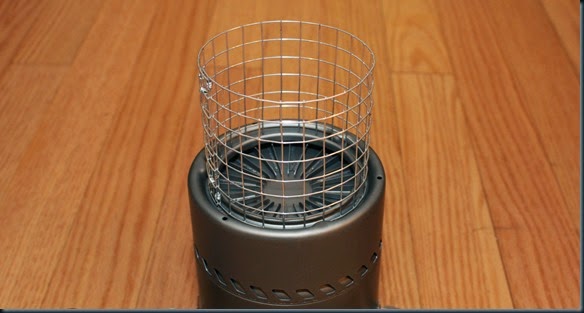
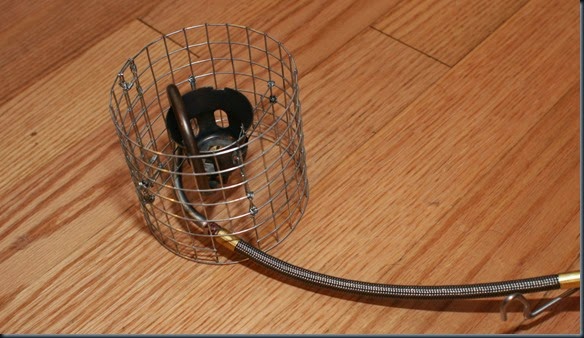
I used a 1/2” galvanized wire mesh to build the stove base. It is commonly used for alcohol stove stands, and is very strong and relatively light. I used a sheet of 7x26 squares, one of the squares being for overlap. The final circular base is 7x25 squares. I used galvanized wire to secure the ends of the mesh to create a cylinder. I cut the mesh using a pair of wire cutters. The result is a stove base that fits perfectly into a channel on the bottom of the Reactor pot.
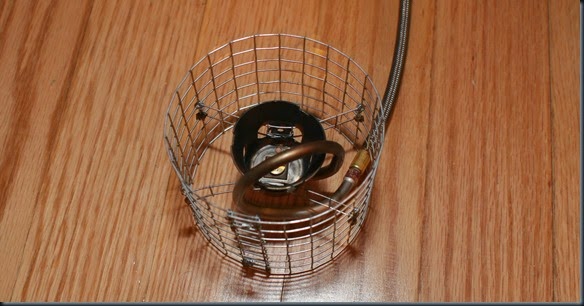
For me the trickiest part to figure out was how to attach the burner to the stove body. The solution was to use two strips of wire mesh, 1x7 squares in size. Each strip threads perfectly through the slots on the side of the burner cup. I used some wire to secure them, but the fit is so good that it’s not needed. I then used wire to attach the ends of each strip to the side of the wire mesh cylinder.
The strips connect to the the middle row of the wire mesh cylinder. I cut out a space in the wire mesh for the hose to pass out of the cylinder.
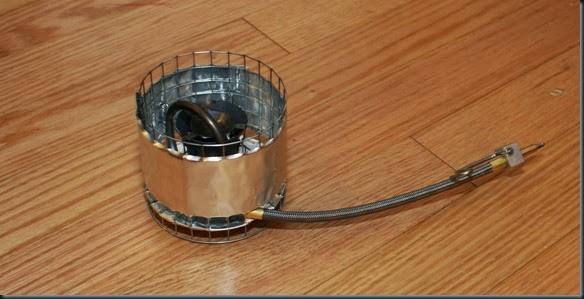
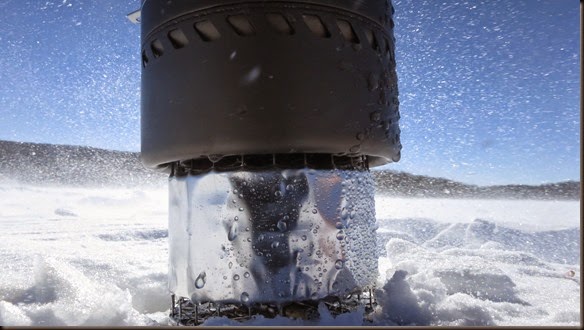
The last step was to put on an integrated wind screen and base. The base I put so that it will catch any spilled over fuel when priming, and more importantly so that it provides flotation for the stove when on snow. I placed it one row up from the bottom so that it does not interfere when the stove is used on unlevel rocky terrain. When putting the windscreen I left it short of the last row of wire mesh. When the pot is placed on the stove, this leaves a gap of about a quarter of an inch between the windscreen and the pot. I thought about bringing the windscreen all the way up, and allowing the air to escape only through the vents on the pot, but I didn’t want to risk limiting the oxygen to the stove too much. Maybe in the future I will play around with it some more.
The weight of the completed stove, together with the stove pump is 8.7oz (247g). During testing at home, it consistently brings 1L of tap water to boil at room temperature in 3 minutes. The stove system as a whole (stove, pump, and pot) weigh a combined 18oz (510g). While this is not a light stove system, considering that the standard MSR Reactor with 1.7L pot weight 17.5oz (496g), it’s not bad at all for the type of system it is. If we keep in mind that an empty 4oz pressurized fuel canister weighs about half to a full ounce more than an empty 11oz white gas fuel bottle, you actually end up with a lighter overall system. It is not as convenient to use as the stock MSR Reactor, but for nearly the same weight, it gives same or better boil time and much better cold weather performance.
The XGK hose is very stiff, but even so, it can be folded enough so that the stove will fit inside the 1.7L Reactor pot.
The wind resistance of this system is not nearly as good as that of the Reactor. I would say that it is slightly better than that of the Jetboil. When a gust of wind gets into the gap between the windscreen and pot, it does effect the flame. There is no risk of the flame being put out though because the burner itself is shielded.
Even with this deficiency however, the stove has been working well so far. A lot of the features you see above have actually been made as trial and error adjustments as I have been using the stove.
I’ll keep messing with this system for some time to come, so I’ll see how it works out on some more challenging trips.
You could also do the same type of set up with a remote canister stove instead of a white gas stove. Something like the Kovea Camp 5 will provide all of the necessary parts for a relatively low cost. However, here I wanted to go all out in making a cold weather stove, so I stuck with the white gas set up.
I wouldn’t use this system in warm weather. In fact, unless I was undertaking some extremely long trip, I wouldn’t even use a pot with an integrated heat exchanger. If you are just boiling a few cups of water per day, it will take a very long time to make up the extra weight of a pot with an integrated heat exchanger, let alone a system like this one. However, when power is the name of the game, this may be a good option.
