Saturday, June 11, 2011

Mora Bushcraft Survival Knife Released For Sale

I know many of you have been waiting for this, and finally, it is available in North America. The Canadian Outdoor and Equipment Co. now carries the Mora Bushcraft Survival Knife. You can buy it here.

Mora%20Survival%20Knife%202

Here are some of the specifications provided on the site:

The Mora Bushcraft Survival – A razor sharp blade with a distinct tip, an all-weather Morakniv® Fire Steel and a Diamond Sharpener make the Bushcraft Survival the natural choice for those who love the great outdoors.

The 2.5mm thick Swedish stainless steel blade stays sharp for a long time, is extremely tolerant against wear and has considerable cutting strength. The blade is ridgeground especially for use with the fire steel.

The robust sheath is provided with a well thought out space for the firesteel and completed with a diamond sharpener, making it easy to sharpen the knife blade. A black handle with high-friction grip gives the finishing touch to the Bushcraft Survival, a knife that suits a tough livestyle!

Razor sharp 2.5 mm thick Swedish stainless steel blade with a distinct tip. All-weather Morakniv® Fire Steel. Integrated Diamond Sharpener. Two Belt Clips.

Integrated Fire Steel. Bring the Fire Steel on your outdoor tour and be able to light a fire wherever you are. Just pull the specially designed knife back slowly and heavily along with the fire steel. The sparks easily light your barbecue, paper, birch bark or dry grass. The protective coating on the steel needs to be scraped off before use. Sparks of 3000 C° makes it easy to light a fire in any kind of weather. Yield up to 7000 strokes. Illuminates even stoves and gas grills. Works in rain and snow. Since it has a strong spark, it can also be used as emergency signal. Use only the back of the knife blade with the fire steel. Never the blade edge!

Price: Cdn $78.99 (That is Canadian dollars)

Friday, June 10, 2011

Council Tool Boy’s Axe Review

I am always on the search for a good commercially available axe at a decent price. I think the Council Tool Boy’s Axe certainly falls into that category.
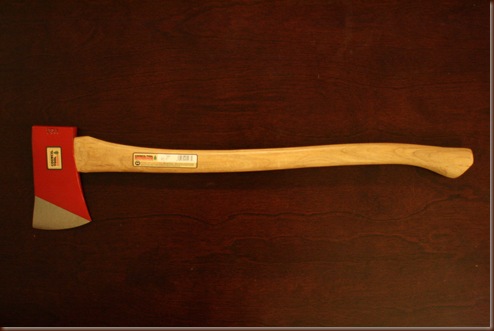
059

Specifications:
Manufacturer: Council Tool Co. Inc.
Axe Head Weight: 2 lb
Axe Length: 27 inches
Axe Head Material: Carbon steel, HRC 48-55 on the Rockwell scale
Handle Material: Hickory
Cost: $40.00 (can be found for less online)

a (8)

This is a very affordable axe. It is not what I would call dirt cheap, but if you do some shopping around, you can find them for about $30, which I would consider a low cost for an axe of this size. Compare it to something like the Husqvarna Traditional Axe, which now costs over $60.

Here you can see the Council Tool Boy’s Axe next to the Gransfors Bruks Scandinavian Forest Axe.

051

a (10)

The handle of the Council Tool Boy’s Axe is two inches longer than that of the Gransfors Bruks Scandinavian Forest Axe. I can’t say enough about the design of the Council Tool handles. In my opinion in that respect they are the best on the market. The feel of a handle is a very personal thing to each user, but for what it’s worth, I have not been able to find any handle that feels better in my hands. The grain orientation is not always spectacular. It can be a little hit or miss. I know they are working on improving that, and the handle on this particular axe has perfect grain orientation. I can not promise that it would be so with all examples. The handle was covered with a light coating of wax.

167

The head of the Council Tool Boy’s Axe is a little heavier than that of the Gransfors Bruks Scandinavian Forest Axe. The Council Tool head is 2 lb (incorrectly listed as being 2.25 lb), while the Gransfors Bruks one is 1.75 lb (incorrectly listed as being 2 lb). The profile of the head is excellent. The bit is very thin, and does not require significant filing to get into shape. The transition of the cheeks to the eye is very smooth and continuous. The head is attached to the handle using an aluminum wedge. It looks like it would be easy to remove, but it is not as I found out. I ended up having to replace the whole handle after my attempt. Of course, that gave me the opportunity to weigh the head.

166

The axe however does not come sharp. Since Council Tool does not actually target its products directly to individual consumers, they rarely come sharp. A few minutes with the file or a course sharpening stone will however put a good edge on it. Because the axe is not sharp, the first quarter of an inch from the edge/bit is a little thicker than what you have on the Gransfors Bruks Scandinavian Forest Axe. If you just sharper the edge, the Council Tool Boy’s Axe will give about the same chopping performance as the Gransfors Bruks Scandinavian Forest Axe, even though it is a quarter of a pound heavier. Of course, the thicker edge would be more durable. If you however take half an hour with a file and thin out the first quarter of an inch from the edge to a thickness similar to that on the Scandinavian Forest Axe, you will have an incredibly well performing axe.
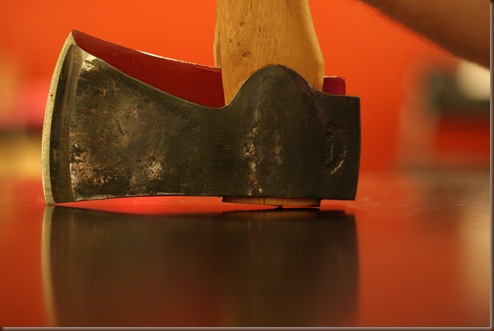
173

The balance of the axe is not ideal. The head is very well balanced with the handle, but the poll needs to be heavier. As you can see from the picture, the bit is hanging lower than the poll. Ideally it would be horizontal.

mmn (4)

Here you can see my finished axe with a leather sheath I put together for it last night.
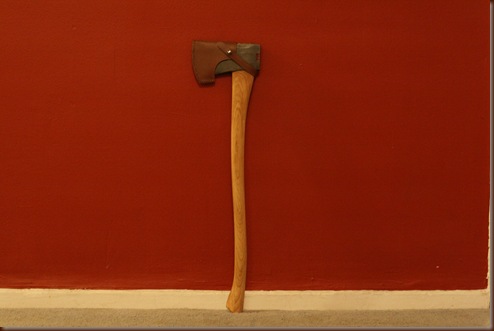
aa (2)

Overall, this is one of the best axes I have been able to find in this price range. In terms of size and weight, it is my ideal axe. Sometimes it is hard to explain why one axe feels right when you hold and swing it, but this one certainly feels right. It is by no means perfect. If you are looking for an axe without any imperfections, you will have to spend the $120 for a Gransfors Bruks axe. However, if you are willing to do a small amount of work, you can get a very well performing axe for a very low price. In fact, for the near future, this will be my main user.

Thursday, June 9, 2011

Lightweight Cooking Kit for Under $20

As you have probably noticed from my past posts, I have been using a rather expensive set of titanium pots to do my cooking. They have performed great all this time, and I have no complaints. However, I know that for many, such high end gear is out of their price range. Because of that, I set out to find and make a low cost complete cooking kit that can be carried by a backpacker.

Disclaimer: When I say lightweight, please remember that I carry an axe in my pack. If you are an ultralight backpacker, this kit will probably be too heavy for you. Also keep in mind that I do a lot of my cooking on a fire, so this effects my choice of pot as well as stove.

The backbone of the cooking kit is the Open Country 2qt Aluminum Pot. It has proven to be an excellent pot. It is just the right size for me, measuring 4 inches in height and 6 inches in diameter. It looks small for a 2qt pot, but is great for cooking for one or two people. It has a bail and a lid, and is very sturdy. I expected it to be a lot softer, but it is a very strong pot. It weighs 7.7 oz. The pot costs $11.

093

I like to have an extra container in my cooking kit. Here I went with a ziplock container that fits well within the Open Country pot. Together with the lid it weighs 0.6 oz. I got 5 containers for about $2. You can see it in the picture together with a mini Bic lighter, which weight 0.4 oz.

113

Next comes the stove (together with windscreen and pot stand). Here I am using an alcohol stove. There are many good DIY designs out there. They all have the advantage of being light weight. I chose the simplest one for the kit, so those who are just starting out can easily make one. All it is, is an open container in which you place the alcohol and light it. I’ve used a 8 ounce Red Bull can, which I have cut so it just colds 2 ounces of alcohol. I find that to be enough fuel to bring two cups of water to a boil and keep it boiling for at least 10 minutes. This stove burns for 13 minutes on 1 ounce of alcohol and brings two cups of water to a boil in 10 minutes. I have put a piece of molefoam on the bottom of the stove, so it provides insulation from the ground when used in cold weather. The stove weighs 0.2 oz. I will try to take a look at some other stove designs later on for those who are interested.

108

I made the pot stand from three Staples “Mega Clips” paper clips. The packet cost me $2. All I did was bend three of them so that the top of the stand is 3/4 of an inch above the top of the stove. I then used wire to bind the legs together to form a tripod. The whole stand weighs 0.8 oz.

096

I did not bind one of the tripod legs, so that I can fold up the stand. Here you can see it folded next to the windscreen, which is just a folded up piece of aluminum foil. It weighs 0.4 oz.

103

So, here are the specifications for the whole kit:


Weight

Cost

Open Country Pot 7.7 oz $11
Ziplock container 0.6 oz $2 (for a whole set)
Pot stand 0.8 oz $2 (for a whole pack)
Stove/Red Bull can 0.2 oz $3
Bic Lighter 0.4 oz $1
Windscreen 0.4 oz  
Total 10.1 oz $19

I like to keep the contents of the kit wrapped in a bandana, which will add another 1 oz to the kit.

So here it is. Modify the kit however you see fit. It is comprised of commercially available items. You don’t have to get “lucky” on ebay or run through army surplus stores. For $20 you can easily make a cooking kit that weighs less than 1 lb. Compare that to a single Zebra pot, which costs $30 and weights 26 oz all by itself.

Wednesday, June 8, 2011

Civil War Winter Camp, 1860s

The picture shows Civil War winter quarters. The house seems to be some sort of an administrative building or headquarters. The remaining structures that you can see to the side are tents.

civil-war-004

Note the axe that the soldier is using to buck the log. It appears to be a full size Jersey pattern axe. It looks very similar to the Jersey patterns of today, but has the rounded top part that can be seen in early models of this pattern. The earliest one I know of is an advertisement from the Pennsylvania Packet and Daily Advertiser from July 7, 1789.